Generate a C# Project
Estimated reading time: 3 minutes
Encore RPG for Visual Studio provides a simple IDE command for generating a standalone C# project equivalent to the current Encore project. Applications produced by C# projects generated by Encore RPG are 100% functionally equivalent to the applications produced by the original Encore RPG projects. The only difference is that Encore code is replaced with C# code managed by a C# project.
Note that C# project migration is a one-way operation. Thereafter, the Encore project and the derived C# project are independent, and only “in sync” until one or the other project is subsequently modified.
The Encore RPG project system provides a few options for creating C# projects, as discussed below.
Translate to C# Project
-
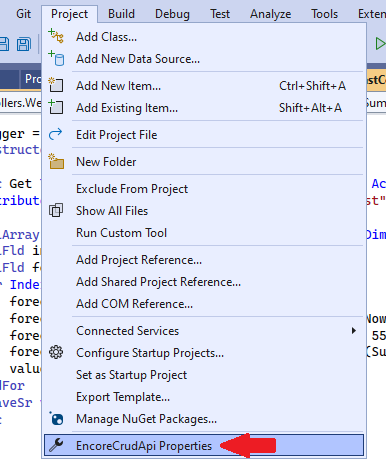
Select the project to migrate in Solution Explorer, and Right-Click to show the context menu. Note the Translate to C# Project command as shown below. Invoke the command.

-
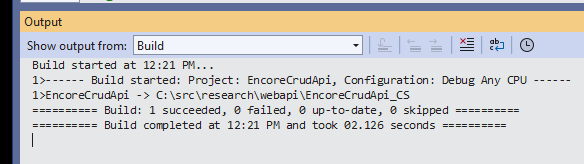
The command starts a project build specifying an option to create a C# project rather than an application. The output, which displays the location of the new project, is shown in the Output window, as shown below.
Note that this command is implemented in Encore SDK via an MSBuild compiler option.
-
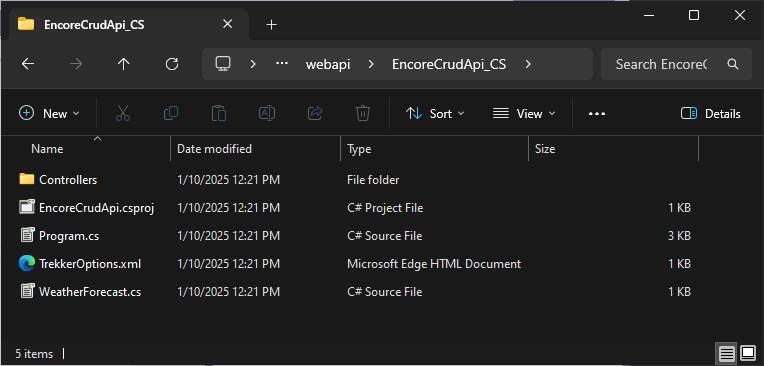
Observe the produced project files in the directory mentioned in the command output.
-
Open the project file (with the
.csprojextension) in Visual Studio to use the new project. Use the Build Solution command on the Build menu (or default key shortcutCtrl+Shift+B) to verify that the project builds the application successfully.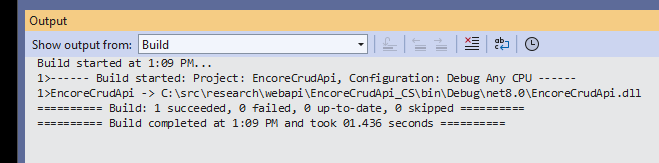
Project Designer Options
Using the Encore project migrated in the prior section as an example, suppose some changes are made to the Encore code after the migration. Now we want to re-migrate the Encore project with those changes.
-
As in the prior section, the Translate to C# Project command is invoked. In this case however, build output below shows a failure, due to the presence of files in the “default” project output location.
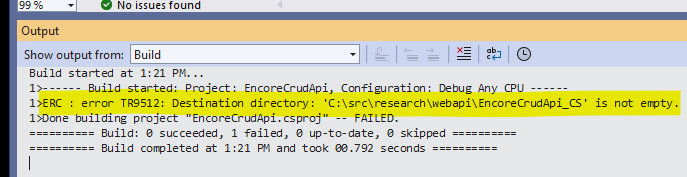
The error can be remedied in several ways, including simply deleting the contents, or the target directory entirely from the file system then re-running the command.
-
Instead of throwing away the prior migration, we can modify a project property to resolve this. On the Project menu, select Properties as shown below.
-
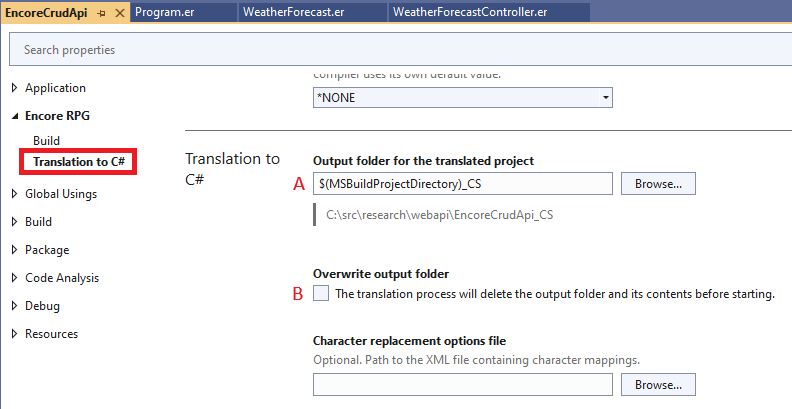
The .NET project “designer” appears. In the left margin, navigate to the Encore RPG section, and then to Translation to C#, as shown below. This presents two options, only one of which allows us to keep the prior migration:
A. Change the Output folder for the translated project path, or
B. Set the Overwrite output folder option.
-
Since we want to save the prior migration, change the output folder name to
$(MSBuildProjectDirectory)_CS_Newin the text box marked ‘A’ above, and re-run the Translate to C# Project command. The output should now show a successful migration in the folder specified.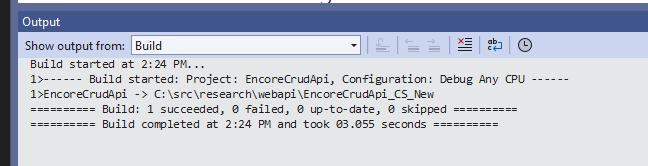
Additional Information
Find out about the new Language Concepts when using Encore RPG.
Describes the Encore RPG programming language reference.
Getting Started with Visual Studio
Learn to code in Visual Studio
IntelliSense® is a registered trademark of Microsoft Corp.